Sunday, October 16, 2016

Week 7: Assessment


Use in the classroom:

*explanations are written individually under each section (multimedia, rubric, poll/survey)

1.       Multimedia assessment (50) – Playposit.com

Objective:  Students will be introduced to the states previously referred to as the 13 Colonies.  Students will identify the 3 regions of the 13 Colonies and explain the characteristics that defined those regions. 

            The video is an introduction to the 13 colonies.  Students should know the names of the 3 regions, the 13 states within the regions, and primary distinguishing characteristics in those regions. The introduction to the students will use the video along with note-taking, and discussion. They will also complete an activity with a map and labeling the states.


o    Standard YouTube License. Published on October 26, 2014. 

*I have included screen shots of the pictures incase anything didn’t come through.  I was having trouble with Youtube.com, but hopefully it will work for you!


Rubric for Project-based Learning Assessment (25)

I would use this rubric for students to first self-assess their own work.  Then it can be used to score a classmate’s work.  Finally, it will be use when I grade the final draft.  Students should reflect on the scores they gave themselves compared to that of a peer and the teacher.  Were the scores similar?

I kept the rubric fairly general so it can be used for a variety of 5-paragraph writing assignments.  Students should see a common and consistent rubric to make their own grading more effective.  I would model grading assignments and would complete several examples with the class participating so students feel comfortable and confident using the rubric.


3. Poll or survey (25) - Plickers.com

Sunday, October 9, 2016

Week 6: Concept Map


Use in the classroom:
Objective:  NGSS Standard 4-PS3-1.  Students will use real world example to explain how material is changed when heat energy is added or taken away.
This concept map will be used as a tool to teach students the identifying characteristics of each stage/phase of matter.  Students can extend on the map by including more examples of each phase and the transitions between them. Student can look for or draw pictures of the example. This can be done in groups of 3 or 4 where each student finds a different example for a different phase. *Note I didn’t get into solid to gas and plasma.  I feel this would be latter lesson.  I want students to first focus on the phases they encounter daily.

Application:
The segmenting principal is applied with concept maps because students can follow each section at a time as needed.  Although I do find it to be a bit overwhelming, so I would try to look for a way to “block off” the other sections so they aren’t distracting.  The redundancy principal works well here because there isn’t an overload of both audio and visual.  Again, the map can a big much, so an redundant information wasn’t included to keep it as simple as possible.

Reflection:

            I enjoyed making the concept map, although I will like to try a different website/program next time.  I liked how it was color-coded and the ease of adding links, photos and videos.  However, it seemed a bit too chaotic and I am not sure if that was just the program or me.  I felt it can be a bit overwhelming, especially for ADD folks like me.  I also wanted to add in the names of phase transitions along the dotted line (evaporation, condensation, etc), but I couldn’t find a way to do that effectively. 

Sunday, October 2, 2016

Week 5


Amber Schumacher
Week 5

·         Use in the classroom:
Objective:  Students will learn facts about countries in North America and their locations by investigating them using a variety of websites and other resources.
My “big picture” intention is to give students an overall idea of “where they are in the universe”.  We started with the Universe and made our way down (Galaxy, Solar System, Continent, Country, etc). As we learn about North America and the United States, I think it is important for students to know the surrounding countries.  The three closest in proximity (Canada, Mexico and Cuba) are required for students to know; not only location, but also a few facts.  This will also be a base of prior knowledge when these countries are in the news or in reading.
I will use the QR codes as a resource/homework that students will take home with them and access.  Since my school has limited technology, students have better access to tablets and smart phones at home.  Students will use the codes to learn about specific North American countries.  Students can use this as a reference for a future quiz and projects.   I think being able to take home QR Codes makes this implementation more successful since technology is so limited at school.  Students who don’t have access to technology at home can use a computer at school in the lab or can borrow a tablet from another teacher.
Since augmented learning is explained as “virtual reality” in our readings, having a low tech school doesn’t allow students to experience many of the exciting tools we are learning about.  However, our school just began construction on a new “high-tech” library.  Although we won’t have access to any resources for several months, students will soon be able to use a 3D printer and VR glasses as part of augmented learning.

·         Application:
The segmenting principal is important for students to work at their own pace.  This assignment fits it well because it allows students to choose what information they want to watch/read and when they want to learn it.   The work is differentiated because students who have not shown mastery with other geography tests will only be required to watch certain videos.  The projects will also be differentiated in this way.  Lower performing students will only do projects on Canada, Mexico, USA or Cuba.  The other students will use this assignment to learn about Central American or Caribbean countries and will choose one to do their project on.  They can use these sites as a resource of information as well.

·         Reflection:
I was surprised at how easy creating the QR Codes were (I hope I did it right).  I wish I had access to more technology in school so I can use them more often.  It is an easier way for me to send links, videos, etc. home than to e-mail or send written out on a piece of paper.  Although I found Aurasma to be cool, I didn’t think it would work as well in my classroom again, due to limited technology.  I also couldn’t believe how the template so easily created the QR codes.  I looked up creating QR codes online and it appears there a lot of resources for creating them.  All of them seemed simple enough to use.  What I liked about the Google Doc template was that it made it easy for me to format for saving and printing. I think if I would have had to save them one at a time, it would have taken forever to compile.
It was interesting to learn about augmented learning.  An augmented learning resource that I have seen online is virtual field trips.  I thought these websites are a good resource for low-income schools that can’t go on real field trips or for schools just too far away.  However, think this lesson and creating the QR Codes are going to be more useful to me in my classroom.  Although the previous week’s activities were awesome to learn about, I found the time required to create them was too intensive.  Creating the codes however, is more manageable.  I have been sharing many of the ideas learned in this class with my teacher colleagues and I think they will really appreciate and use the QR Code template.  Many other teachers have access to more technology than I do, so they would even be able to use them more in their classroom.

https://docs.google.com/spreadsheets/d/1FieoLACWj7f52qhMX9fuRcmZ5H6zaTBFYU7jq5yvPOc/edit?usp=sharing


Citations:
·         Standard YouTube License.
·         © 2016 NATIONAL GEOGRAPHIC PARTNERS, LLC. 
·         2014-2016 Enchanted Learning, LLC
·         All maps, graphics, flags, photos and original descriptions @ 2016 worldatlas.com
·         © 2000-2116 Sandbox Networks, Inc., publishing as Infoplease


Sunday, September 25, 2016

Week 4: Video


Video Evaluation: I teach fourth grade at a Baltimore City Public School.  The Baltimore City math curriculum follows one created called Engage NY that follows Common Core Standards. They have posted the YouTube several instructional videos.  I am currently on the seventh lesson of my unit.  I found the corresponding instructional video online.  I know that students benefit from seeing and learning different ways to solve a problem.  Watching this video will introduce a new strategy to students that I may not have taught, or perhaps executed differently during my lesson.  I find KhanAcedemy.com lessons to be very similar in purpose.  I will actually show both as an introduction to the lesson (engagement) and as a review/conclusion.  This will also expose them overall to more expose and ability to practice as they follow along. I would stop the video after the introduction of the problem.  I can walk around and check to see who can solve the problem before it is solved on the board and who still needs assistance.
The first of the ten factors to consider when evaluating a podcast is that the content should be appropriate for the current area of study.  Since this video was made specifically for my lesson’s curriculum, it is obviously appropriate.  Another factor is that the video should hold the student’s attention.  This is the one area that I don’t think that the video does as well.  This may seem odd, but there is something I find unpleasant about the speaker’s voice.  In comparison, I find the voice on Khan Academy to be more pleasant and engaging.  To counteract this, pausing the video and giving additional instruction for me will make it more interactive for the students to increase engagement.  I feel that the Engage NY instructional video meets all the ten factors of evaluating a podcast/video.


Works Cited:  Bard Williams.  “Choosing the Right Podcasts for Your Classroom” an excerpt from Educator’s Podcast Guide. International Society for Technology in Education. (2007).  Pages 1-8.

Creating Video: 


Use in the classroom:
Common Core Standard:  W4.5.  With guidance and support form peers and adults, develop and strengthen writing as needed by planning, revising and editing.
Objective: Students will learn proofreading marks in order to peer edit classmates’ writing.

I will show this video to students at the beginning of the year as a reminder of some proofreading marks they will use when editing peer’s writing.  This video can be used for a range of upper elementary classroom including my fourth grade class.  Students also need to know the meaning of the marks so they can interpret and fix their own writing. 
I would like to be able to create more engaging video and other multimedia materials.  I would also like to encourage my students to be able to create similar materials for projects.  My concern is the time it takes to create these projects.   The multiple hours it take me to create these object would be multiplied for the students.  Also, students only have access to a minimal amount of computers and other electronics.

Application:
This supports creativity in the classroom because it engages students.  I would be able to show this video without standing up in front of the room and giving the same mini lesson which can be boring.  I think my students would also find it a little humorous (since it is a little cheesy), which will make them  more engaged and thus bringing out their own creativity.   I tried to remember the redundancy principal when creating my video.  The video doesn’t expect students to do any instructional reading, but to just watch and listen as I model the editing.  This way it isn’t information overload.

Reflection:
My thinking has changed because I remembered how important it is for students to be creative in class.  I don’t think that my lesson topic necessary fosters creativity within the students as much as it forced me to be creative as a teacher.  However, I would like to encourage students to be more creative when completing projects or when writing.  I think that setting an example of creativity through the lesson helps.  I also used to be really good at projects in school and hope that sharing those ideas with students helps them feel confident in expressing their own creativity.
 Although creating the video was fun, it still takes too much time for me to be able to do something like this frequently.  I was additionally happy to discover this week that I can record my work through Active Inspire, although I didn’t use it for this assignment.  I would like to be able to save video and audio of a lesson for reflection and for students to be able to watch if they are absent or need a refresher of the lesson.  Overall I liked the assignment; but as I mentioned before, I don’t think I will able to create videos like this much during the school year.  I would however like to have a goal of creating some more videos and other artifacts over the summer for the upcoming school year. 

Sunday, September 18, 2016

Week 3: Digital Images

                                                                  Week 3 Assignment: Digital Images

·         Use in the classroom or learning environment:
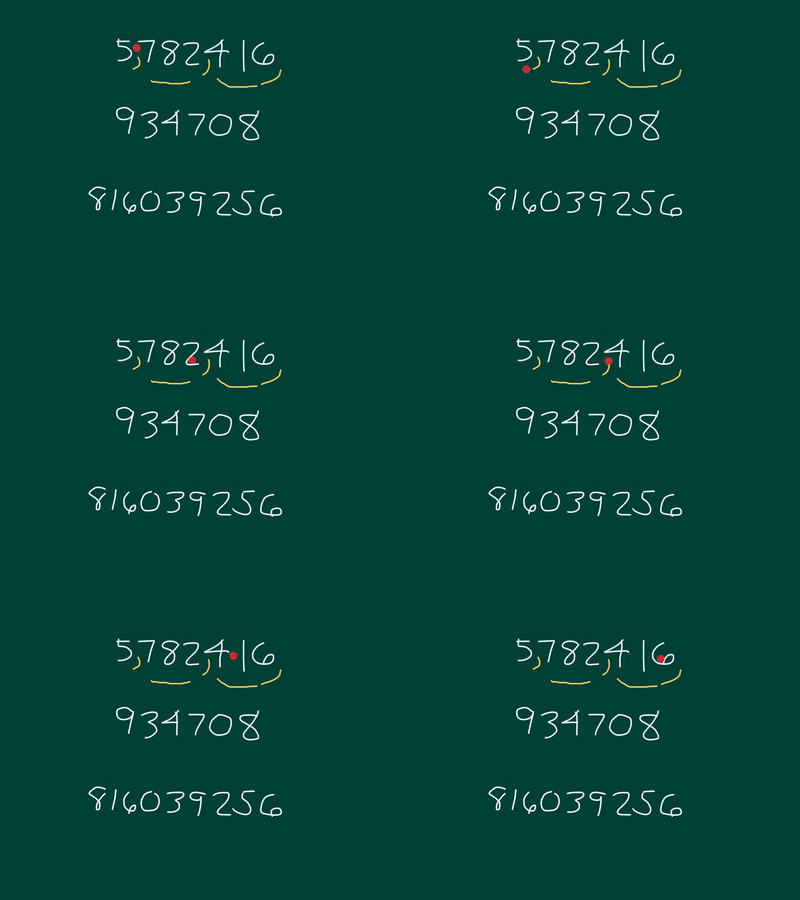
- Review:  Place Value vs. Value. 
- Students will look through artifacts to review place value and value. Students should be able to know the difference between value and place value.  They should also be able to read a large number.  Students review up to millions place. 
- STANDARD: 4NBT.A.2  Read and write multi-digit whole numbers using base-ten, numerals, number names, and expanded form.
- OBJECTIVE: Students will explain the difference between value and place value and identify them for numbers up to the millions place.  
* Could alternatively be taught as a small group lesson.
- Show: Value vs Place Value (Infographic) Read difference.  Value of  “6”?
- Show: How to read number.  Show number (GIF).  Have students practice saying in group.  Point out periods/family and commas in clip. 
- Show: Assessment: (Photo collage) What is the value of the 5?

I will use technology by showing images and video on the board.  Lower income students like mine don’t have access to as much internet.  It is more effective for me to introduce media on the promethean (smart) board, since many students wouldn’t be able to access this informational from home.

·         Application:
Since students have seen this information before, it is important that the information and the delivery of the information isn't redundant.  That is why I used different information for each slide, so students weren’t seeing the same information over and over again. The segmenting principal says students learn better when information is given to them in small doses.  Having the three different artifacts shown separately will allow this.      

·         Reflection:
I enjoyed learning about Pixlr and editing photos.  I had a hard time with easel.ly and creating the infographic.  It did like being able to use the images given, but I felt I could have made something similar in Microsoft or Google 
Docs. I teach in a low income school so I understand the limitations students have accessing internet and technology.  The students not only face access issues at home, but the school’s technology is also limited. 

ARTIFACTS


Photo of dollar bills.  No attribution required.  pixabay.com


Here is a link to my GIF: http://makeagif.com/wHYDAQ

Grade
4 Engage NY module 1 lesson 3

This was created using the video Grade 4 Engage NY module 1 lesson 3.  Creative Commons Attribution license (reuse allowed) (2015)


Photo of place value chart. Polk School District. Attribution.

Sunday, September 11, 2016

WEEK 2 Copyright


Week 2 Assignment: Copyright and Creative Commons/Padlet
Use in the classroom or educational setting/Lesson:
-          Students will access the Padlet page on their own in a small group.  They will be directed to watch/ view items in the following order (which is not necessarily the order they see on the board).  This would be an ongoing task for those who finish work early and then wrap it up with the whole group.  
-          4th Grade Standard: RL 4.3. Describe in depth a character, setting, or event in a story or drama, drawing on specific details in the text.
-          Objective:  Students will identify the character traits of a major character in their story and justify those traits by citing evidence from the text.
o   Watch the 2 videos reviewing character traits
o   Review the 2 lists of character traits.  Add to notes.
o   Look at 2 pictures (runner and Schumacher) and describe what characteristics they would predict just looking at the picture.  Students can add characteristics to the Padlet.
o   Students choose 1 of the 3 graphic organizers to complete with their ongoing independent reading book.
o   Assessment: Students can begin to read the “Jumping Frog” story online.  Complete hard copy.

-          At the end of fourth grade, students write a five paragraph research essay.  We begin discussing the rules of research and citing.  Primary and secondary sources are discussed.  I will teach students that they need to copy the title, author, date/year published, date accessed when they find an article, etc. We also discuss citing sources within the paper (mostly MLA style since it is fairly easy).  This will be the first time many students are seeing/hearing about copyright/sources/citation, etc.
Application:
            Last week the segmenting principal really stood out to me and my classroom.  I think the Padlet website connects well with the principal because students can look at each piece added to the Padlet (picture/website/graphic organizer) at their own pace.  The lesson overall aligns with this principal because all students are working at their same pace, yet all students are accountable for their learning with an assessment at the end. 
            The redundancy principal explains that students learn better when they see and hear information presented only once verses reading and hearing it at the same time.  Padlet allows students to listen to videos or songs and see images without extra information.  This is because they are learning the information independently and not hearing the information from the teacher as well.
            I used both principals in designing my lesson because they are easy to implement and they lend themselves nicely to the Padlet format. It’s an easy practice for students when they work independently or in small groups.   
Reflection:
My thinking hasn’t really changed much this week from what I have learned about copyright, creative commons, etc. in the past.  I understand the importance protecting your own images and ideas as well as protecting the rights of others.  What really stood out to me and made me think was when I added the photo of myself to my page.  I realized that I wouldn’t want someone using my image without permission, especially for something I don’t approve of or if the photo was altered in some way.  I enjoyed finding all the resources for my Padlet page and creating the board.  I think that the students would like using the website for research projects and other activities.  The issue I have with Padlet and other technology in general is that students have little access to it at school and at home.  There are very few computers at school for students to access and many of my students only have internet access through their parents’ Smart Phones.

I didn’t notice any tensions between the content and principals because as I stated before, the principals lent themselves nicely to the Padlet format.   I enjoyed creating the Padlet page and finding the resources.  Finding the copyright citations was not fun and tedious.  The only question I guess I have left is the expectation for student citation.  If I were to have students (8-10 years old) create a Padlet page with images, are they expected to cite the same as an adult?  Or is there a level understanding for younger students?